
Quick answer: To inspect a commercial property, (1) collect and review documents, (2) walk the site and exterior, (3) inspect the roof, (4) evaluate structure, HVAC, plumbing and electrical, (5) check life safety and accessibility, (6) use diagnostics like thermal imaging and drones where needed, and (7) turn findings into a prioritized, cost-based report before your contingency expires.
Whether you are an investor screening deals or a buyer in escrow, a disciplined process matters more than any single tool. This is the sequence we follow on commercial properties across Southern California, written so you know what a professional inspection should cover and what to ask for.
Step 1: Review documents before the site visit
The building's paperwork tells you where to look. Request:
- Building permits, plans and certificates of occupancy
- Prior inspection reports, PCAs and environmental reports
- Roof, HVAC and equipment warranties
- Service contracts and maintenance logs (HVAC, elevators, fire systems, backflow)
- Leases, especially maintenance and capital repair clauses
- Notices of violation and insurance loss history
Compare what you receive with what you see on site. A roof warranty that expired years ago or a tenant improvement with no permit is a lead to follow.
Step 2: Walk the site and exterior
Start outside. Look at grading and drainage toward the building, paving condition, curbs, retaining walls, landscaping irrigation against walls, lighting, fences and trash enclosures. Then study the envelope: wall cladding, stucco or tilt-up panels, sealant joints, windows, storefronts, doors and signs of past leaks such as staining.
Step 3: Inspect the roof
The roof is often the single biggest near-term expense. Walk the whole surface where it is safe. Note the covering type, ponding, seams, flashing at parapets and curbs, drains and scuppers, penetrations, skylights and prior patches. For large, high or fragile roofs, drone inspections give full coverage without unnecessary risk, and aerial imagery documents conditions for the report.
Step 4: Evaluate structure and MEP systems
Structure
Look for slab cracks, settlement, out-of-plumb walls, corroded steel, damaged framing and signs of water damage in the attic or ceiling plenum. Refer significant concerns to a structural engineer.
HVAC
Record each unit's make, model, manufacture date and condition from its data plate. Check for corrosion, operation, maintenance tags, ductwork and controls. Same-age equipment means same-time replacements.
Plumbing
Check supply piping, water heaters, fixtures, backflow devices, grease interceptors and visible waste lines. Consider a sewer camera scope for older buildings with cast iron or clay lines.
Electrical
Review service size, main switchgear, panels, labeling, grounding and visible wiring. Note obsolete or modified equipment and any unsafe conditions.
Step 5: Check life safety and accessibility
Confirm fire sprinkler and alarm systems are present and certified, exits are clear and marked, emergency lighting works and fire extinguishers are tagged. Evaluate accessible parking, routes, entrances and restrooms. In California, accessibility deficiencies carry real litigation risk.
Step 6: Add diagnostics where they pay off
| Tool | What it finds |
|---|---|
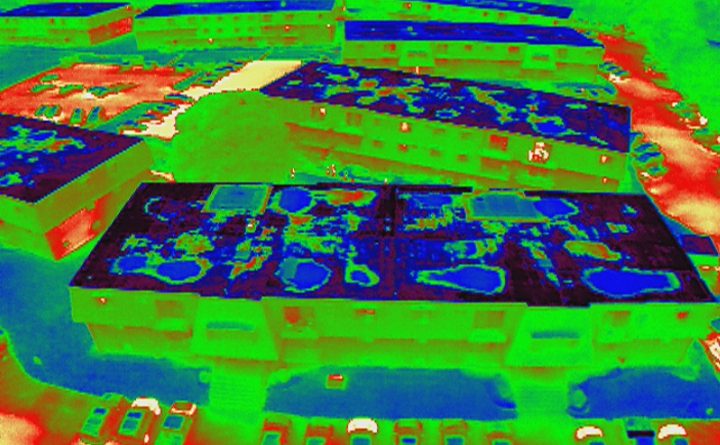
| Infrared thermal imaging | Wet roof insulation, hidden leaks, overheating electrical connections |
| Drone imagery | Full roof and facade coverage, inaccessible areas |
| Moisture meters | Confirms suspected wet materials |
| Sewer camera | Cracked, sagging or root-blocked drain lines |
Our infrared thermal imaging inspections are often the difference between "roof looks fair" and "30% of the roof insulation is wet."
Step 7: Turn findings into a decision
A useful report ranks findings by urgency, includes clear photographs and, ideally, estimates costs. If a lender is involved, you need a property condition assessment with immediate repair and reserve tables. Use the findings to negotiate a price reduction, credit, repairs or escrow before your due diligence period ends.
Common mistakes to avoid
- Inspecting only a sample of units or skipping the roof.
- Waiting until the last week of escrow to schedule.
- Relying on the seller's old report without verifying it.
- Forgetting environmental due diligence; pair the inspection with a Phase I ESA.
- Treating cosmetic updates as evidence of good condition.
Plan access before the visit
Access problems cause more incomplete inspections than anything else. Confirm roof access (hatch, ladder or lift), keys to every mechanical, electrical and fire riser room, and permission to enter tenant spaces. Notify tenants in advance. Identify any areas that are locked, occupied by sensitive operations or unsafe so the report can document them. For multi-tenant buildings, agree on which units will be sampled if not all can be entered.
Tailor the checklist to the property
The core steps apply to every building, but the emphasis shifts. Restaurants need close attention to kitchen exhaust, grease interceptors and roof areas around hoods. Industrial buildings call for dock equipment, slab condition and fire sprinkler capacity relative to storage. Multifamily needs unit sampling, water heaters, balconies and decks. Medical and laboratory spaces have specialized mechanical and electrical systems. Older buildings may warrant asbestos or lead testing before renovation. A professional inspector adjusts the plan for these differences before arriving.
What a good report looks like
- A clear executive summary with the most important findings first.
- Findings organized by system with location, photographs and recommended action.
- Equipment inventories showing ages and condition.
- A list of areas not accessed and why.
- Cost estimates or a replacement schedule when the transaction needs them.
- Referrals to specialists where conditions are beyond a general inspection.
Timeline for a typical deal
In a 30 to 45 day due diligence window, book the inspection and Phase I in the first week, complete the site visit in week one or two, receive reports within 1–3 days, then use the remaining time for specialist follow-up, bids and negotiation. Waiting until the final week leaves no room to respond to what the report finds.
Inspecting vs. screening a deal yourself
Investors often walk a property before making an offer, and that is smart. A quick screening walk can reveal obvious red flags: a roof covered in patches, rusted rooftop units, cracked paving, water stains on ceiling tiles or a dry cleaner next door. Use that walk to decide whether to pursue the deal, then hire an independent inspector once you are in escrow. Your own notes are not something a lender, insurer or attorney can rely on, and an experienced inspector will see conditions that are easy to miss without training and the right tools.
Frequently asked questions
How long does a commercial inspection take?
Most small to mid-size buildings take a few hours to a full day on site. Large or multi-building properties can take several days. Reports are typically delivered in 1–3 days.
What documents should I gather?
Permits, certificate of occupancy, prior inspection reports, roof and HVAC warranties, maintenance contracts, utility bills, leases showing maintenance responsibility and any known violations.
Should I attend the inspection?
Yes, at least for the closing walk-through. You will understand the findings better and can ask questions on site.
Do I need drones or thermal imaging?
For large, steep or hard-to-access roofs, drones improve coverage and safety. Thermal imaging finds moisture and electrical hot spots that a visual inspection cannot.
Can I inspect a commercial building myself?
You can do a preliminary walk to screen a property, but for a purchase or loan you need an independent qualified inspector whose report a lender and your attorney can rely on.
Prefer to hand it off? Our team performs commercial property inspections in San Diego and across Southern California.
Get a scope and proposal
U.S. Commercial Building Inspections serves San Diego, Orange, Los Angeles, Riverside and San Bernardino counties. Call 619-473-2133 or request a quote and we will reply the same or next business day with a scope and proposal.
Related inspection services
About the author

Maurice Bedard
Chief Inspector & Owner · CCPI, CMI, CMR
Maurice Bedard is the chief inspector and owner of U.S. Commercial Building Inspections, a Certified Commercial Property Inspector with more than 25 years in commercial real estate, construction, restoration and remediation across Southern California. He has personally inspected office, retail, industrial, multifamily and institutional buildings for buyers, owners, brokers and lenders throughout San Diego, Orange, Los Angeles, Riverside and San Bernardino Counties.
Written and reviewed by Maurice Bedard · Published September 29, 2026 · Updated September 29, 2026
More about our inspectors · Questions about your building? Call 619-473-2133.